With Windows 11 being released this month, you probably have been itching to get your hands on it. I can understand why, considering the huge changes coming with it. Read on to learn how to install Windows 11 easily. I’ve been working on this post for a while to get you all the information you’ll need. While I’ll include the installation process, I’ll also add ways to check compatibility and other important things that you might’ve missed out on.
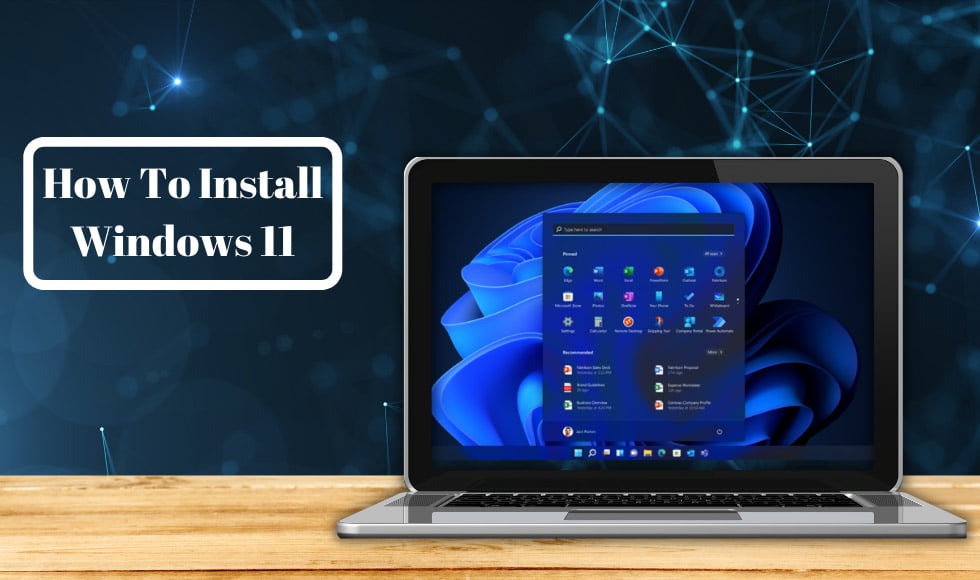
Should You Upgrade To Windows 11?
If your PC supports it, go ahead. There’s no downside to moving from Windows 10 to 11. You’ll get better security, better performance and many powerful features. You can benefit greatly from these features once you learn how to use them.
You can still stay on Windows 10 if you like, though. It’ll continue receiving security and feature updates from Microsoft even when Windows 11 becomes stable. In fact, the support will last up until 2025, so you can still use it safely without moving on to the new OS.
What Changes To Expect In Windows 11
As this is an entirely new version of Windows, you can expect plenty of big changes. Besides the usual performance optimisations, you’ll get other great things, like a sleek new UI and more efficient multitasking features.
Here I’ll talk about some of the most noteworthy changes, including the earlier mentioned ones.
1. A New Material UI
The first thing you’ll notice about the new Windows is its look. It’s a far cry from its predecessor. The start menu, explorer interface- everything is different. The start menu is more centred, and the colours of the UI are lighter and more pastel-like. All explorer windows also have a slightly different design with rounded corners that compliment the overall material aesthetic.
2. Built-in Support For Android Apps
This version of Windows has far better integration with Android- you can even run some Android apps. Not all apps are supported; you can only use a select few from the Amazon Appstore, which you can download from Microsoft Store. However, as the OS develops, there will be support for more apps.
3. Widgets
For Vista and Windows 7 users, this one is going to be a treat. The widgets on Windows 11 are essentially an improved version of the old Desktop Gadgets feature. You can use Widgets to pin notes or quickly view news and weather.
4. Improved Integration For Microsoft Teams
Official video conferences will also be far better, thanks to Microsoft’s new updates to their Teams app. These updates introduce plenty of quality of life changes which offer more convenience for the user. The app will run even better on Windows 11, and it’s pinned to the taskbar, so it’ll be much easier to access.
5. Better Gaming Performance
Though Windows 10 and 11 go toe-to-toe in performance right now, the latter has more potential. Windows 11 brings in some of Xbox’s best gaming features; Auto HDR and DirectStorage. The former makes games look better without impacting performance, while DirectStorage reduces stress on CPUs, making gaming better on CPU bottlenecked computers.
I wouldn’t advise against making the latter a factor in deciding whether or not to get Win 11, though. PC games don’t come with built-in support for DirectStorage. The developers will have to add that, so you won’t be able to use the feature for a while.
6. Re-iterated Virtual Desktop Feature
Virtual Desktop is one of the best productivity tools in Windows, though not many know about it. It lets you cycle through desktops with different content on them, making it easier to change to the appropriate desktop for any situation. For instance, you can keep your work files open on one virtual desktop while keeping a browser on another for casual use. You can switch between both conveniently without closing anything. There won’t be any clutter to hamper workflow.
The new update makes things even better, allowing the user to name each virtual desktop. Hence, you can be more organised. You can personalise things more, too, as Windows 11 also allows you to put different backgrounds on every virtual desktop. That means each desktop will be even easier to distinguish.
7. More Convenient Multitasking System
Better multitasking is always good. It’ll make your user experience smoother, regardless of the type of user you are. Windows 11 comes with extra multitasking features called Snap Groups and Snap Layouts. Both of these will allow you to make even better use of your screen space, especially if you use a widescreen monitor. With the Snap Layout feature, you can have multiple windows open in certain size layouts on the screen without manually adjusting anything.
Once you’re done with that, you can also minimise them as a group to the taskbar. When you press on the group, all the preset windows will maximise at once.
Recommended Reading: The 11 Best laptops under 40000 in India 2023: Expert Picks
Minimum Requirements For Installation
These are the factors you need to look at before installing the new OS.
- TPM Chip: You need to ensure that your system has TPM 2.0, a chip located on the motherboard. This requirement is one of the most important. Most newer desktop PCs should have it.
- Processor Support: Windows 11 won’t run stable on old hardware because it lacks support for older processors. It’ll only run on a select number of Intel, AMD and Qualcomm processors.
- Adequate RAM: You need at least 4 GBs of RAM to run the system. Although, I’d suggest you at least have 8 GBs of RAM on your system to run the OS without any lag.
- Large Disk Space: Unlike its predecessor, this new Windows needs quite a bit of extra space for installation. 20 GB isn’t enough- you have to have 64 GBs free to install this OS.
- Specific Boot Firmware: Keep in mind that Windows 11 only runs on a UEFI Secure Boot enabled system. Most newer motherboards support that, so you shouldn’t have any trouble. You might need to change hardware if you’re on a fairly old system, though.
- GPU With Newer DirectX Support: Your system’s graphics card needs to have support for DirectX 12. The GPU also needs to support WDDM 2.0 drivers.
- HD Display: Your screen needs to be at least 720p (1280×720) to avoid scaling issues. The physical size of the display also needs to be more than 9 inches.
For the most part, you can’t install the OS if you don’t meet these requirements. There are ways to get it installed on an unsupported computer, but they’re not worth the hassle.
You also need to be careful when getting a new laptop since many older models aren’t compatible. You can’t change hardware if the one you get isn’t. Most of the recent high-quality laptops should be able to run Windows 11, though.
If you’re not sure whether your already owned rig supports the new OS or not, you can check compatibility through Microsoft’s official PC Health Check app. Once you’re sure your rig can run Win 11, you can move on to the main step- Installation.
Recommended Reading: Which are the Best laptops under 50,000 in 2023? Top 11 Picks
How To Install Windows 11
Before you get to the main process, you need to create an installation media. To make one, you’ll need to download an ISO file. Select the appropriate options, and you’ll find the option for the download at the bottom of the page. Ignore the instructions for creating an installation media on the page for now- I’ll show you a better way.
Creating An Installation Media
First, you need to get yourself a USB stick- preferably a 16GB one. Make sure that the stick is empty and has no important data, as the media creation process will erase everything in it.
Now, go download Rufus, which will be the app we’ll use to make the media. Once you get it, do the installation and launch it. From there, the program will do most of the work for you, including selecting the necessary settings. All you need to do is press the “Select” button and select your ISO file using the file explorer window that pops up. Once selected, press the “Start” button. A prompt will pop up saying all data on the USB Stick will be destroyed. If you’ve ensured that the stick is free of important data like I said earlier, simply press OK, and the process will begin. Wait a little while, and you’ll have your Installation Media ready.
The Main Installation Process
Actually installing Windows is fairly easy. It’s the same process as installing Windows 10. However, if you’re new to this, I’ll help you out and explain the process in detail.
First off, take a look at the free space and total space on your C drive- you’ll need the information later. Make sure to backup important data since the new Windows install will require you to erase old data. Then, you can plug in the USB with the setup files and reboot your PC.
When your manufacturer logo flashes after the reboot, go into your BIOS settings or press the button for Boot Options directly if it shows up under the logo. The buttons might vary from computer to computer, so if you can’t find what’s the right one for your PC, try pressing F2, F10 or Del.
Afterwards, your PC will reboot again, and the screen after the manufacturer logo shows will say something like “Press any key to boot from USB…”. Pressing a button on your keyboard then will start the setup process. You’ll be greeted by this screen at first.
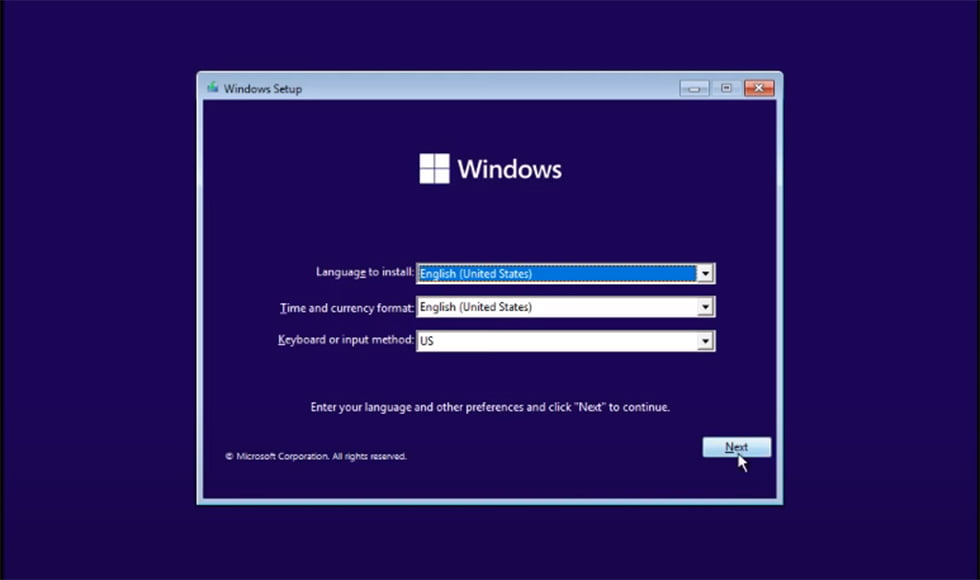
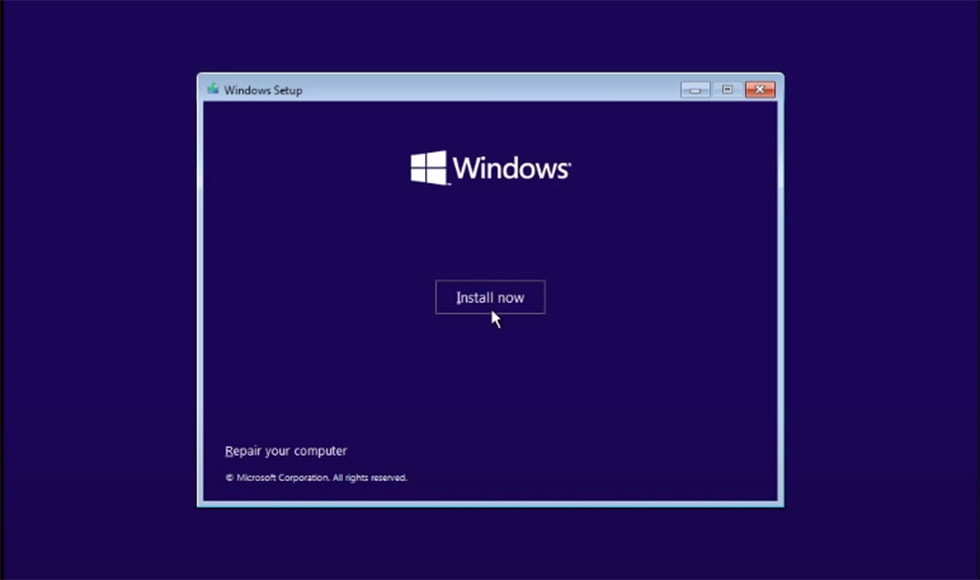
You need to click next. I’d suggest leaving everything in this Window as it is. After that, the main installation start Window will appear. Just click Install Now.
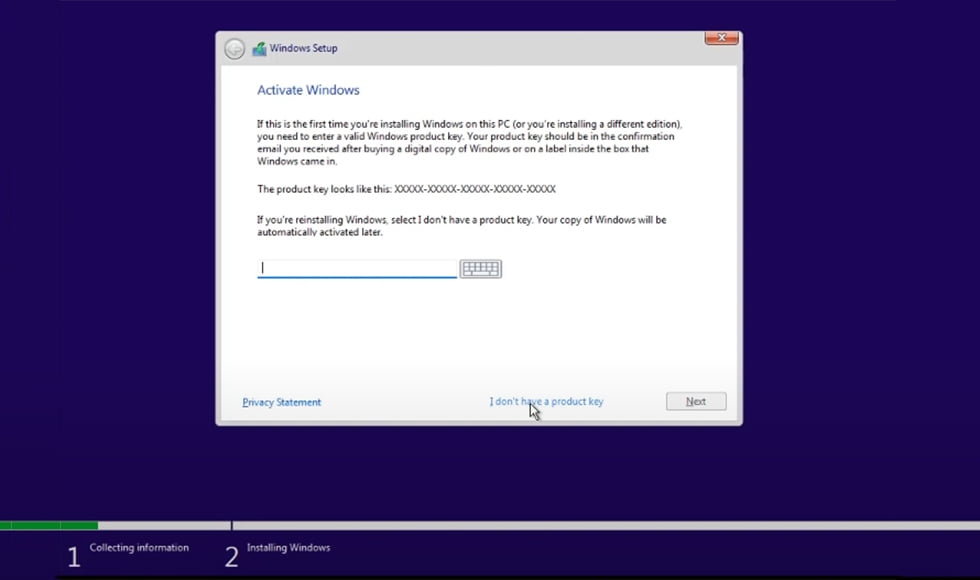
You’ll then be prompted to activate Windows. You can skip that for now by pressing the button in the screenshot below. Windows will still run alright, and you can activate it later.
On the next screen, you can choose which version of Windows to install. I’d advise going with Windows 11 Pro.
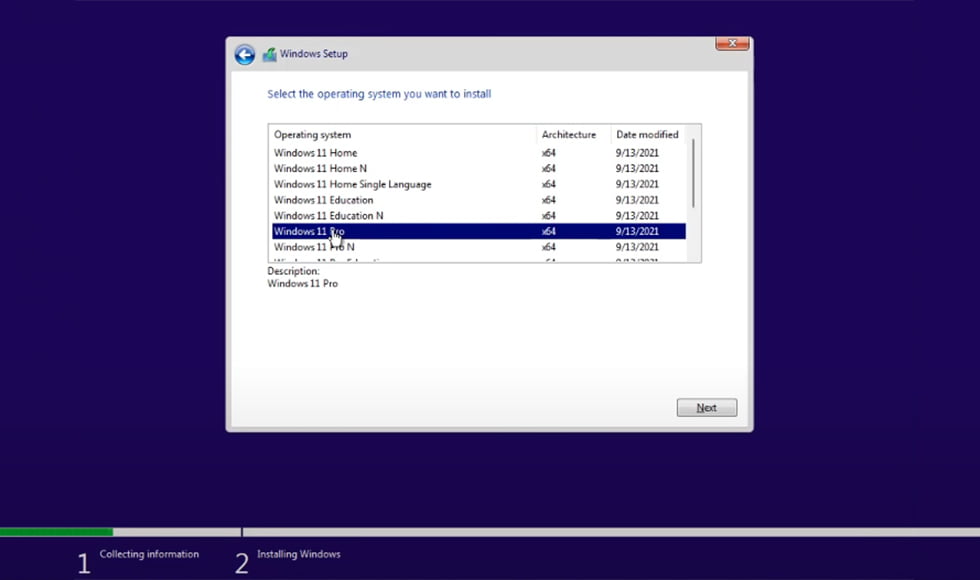
Click next, then accept the terms and conditions on the following page and press next again. You’ll then be given two options. You can either Upgrade or do a Custom Install. Pick the latter; you’ll get the best experience from a fresh install. The next page will be the most complicated part of the setup process, though it’s still pretty easy. Remember the free and total spaces I asked you to look at the start? Find the primary partition with the exact size based on that info. You’ll have some trouble finding the right drive if it isn’t named, so my earlier tip should help.
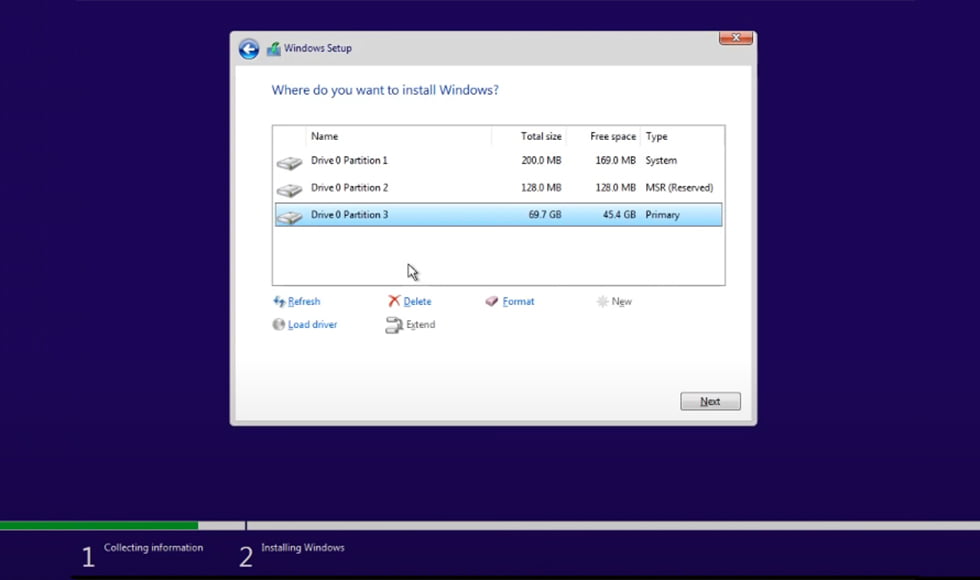
In my case, Partition 3 is my old Windows drive. Select the appropriate partition of your disk drive and then click Delete. A warning will show up, but there’s no need to worry about it if you backed up your important files. Press OK. Then you’ll get a drive labelled “Unallocated Space”. Select that drive and press next; Windows will then start installing files of the new update.
It’ll take more or less than 30 minutes, based on how powerful your hardware is. The computer might restart a few times during the process- there’s no need to be worried about that.
Post-Install Setup
Once everything is complete, Windows will then prompt you to set up your personal settings.
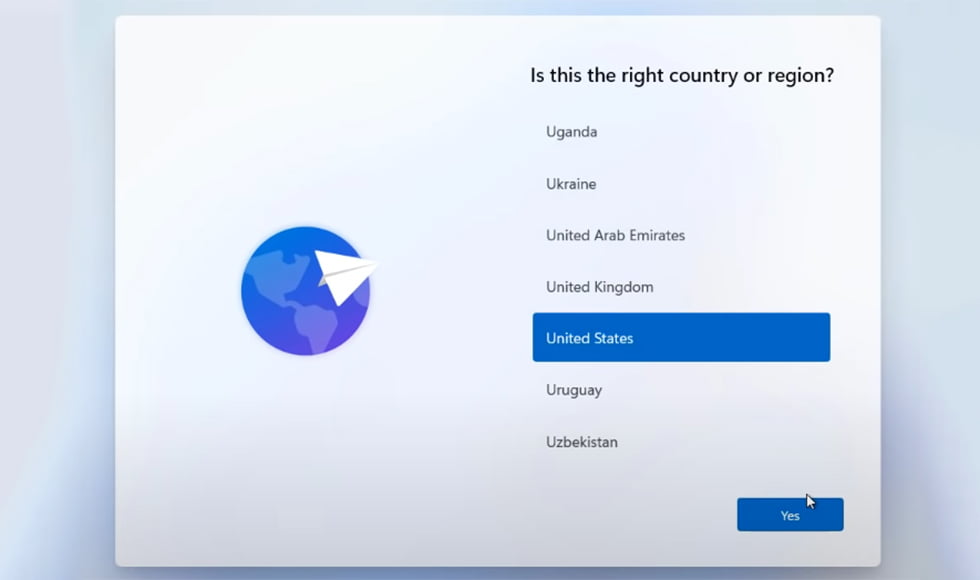
This part is fairly simple- Windows will guide you through what you need to do on each page. Adjust everything to your liking, and after everything is complete, Windows will start finalising the process.

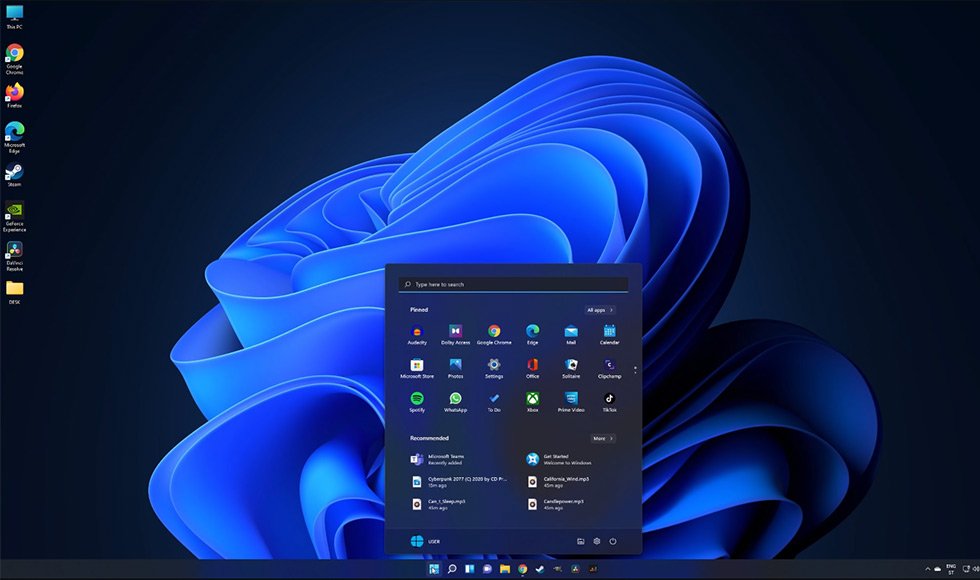
Now sit back and let the OS do everything for you. After it finishes, the installation will be complete, and you can start experiencing the magic of the brand new Windows 11.
Recommended Reading: 11 Best laptops under 30000 in India 2023 – Reviews & Buyer’s Guide
Frequently Asked Questions
In this section, I’ll try to address any possible questions you might have about installing Windows 11.
Recommended Reading: Best Gaming Laptops Under 60000 in India 2023 – Reviews & Buyer’s Guide
Wrapping Up
There you go- I’ve told you how to install Windows 11 quickly and easily. You can now run it and enjoy the newest and most advanced features. There will be even more features coming in the future- the changes I’ve mentioned in this post only barely scratch the surface of what is to come.
One more thing- if you’re going to be installing the OS on a laptop, I also have an article on setting up laptops that might be useful. It’ll help you get the best performance out of the laptop from the start. You can also use the article for a desktop PC, though most of the information is centred around laptops.
- Need An Entry-Level NVIDIA GTX 1650 Laptop? Check Out The ASUS TUF Gaming A15 15.6″ FHD AMD Ryzen 5 4600H - December 19, 2022
- Why You Should Try The Lenovo IdeaPad Gaming 3 AMD Ryzen 5 5600H 120Hz Gaming Laptop – A Laptop Designed To Last - November 8, 2022
- A Review Of The HP Pavilion Gaming DK2100TX 15.6-inch Laptop – The best 11th Gen Mid-range Laptop - November 8, 2022
