Laptops age worse than desktops do. They’re generally less powerful than a desktop computer, and so they don’t tend to handle stress as well. But the practicality of a portable laptop is undeniable. If your laptop is running slowly with what seems like 1/4th of its original speed, then you might need to do several tweaks to bring the performance up again. There are several things you can do software and hardware-wise. In this article, we’ll talk about how to speed up laptops.

If you follow our suggestions, you can have the laptop running at peak performance or even better than when it was new. These tips from our experts are things just about anyone can do, and you’re bound to notice the change in performance once you’ve tried them out.
How To Speed Up Laptops with Software Methods
Hardware changes are more expensive than just optimising the laptop’s software to boost performance. So let’s start with the software option first. There are many things you can do here without any need of money.
1. Close running apps from the system tray
If your laptop runs slow as soon as it boots up, you can make it a little faster by closing off apps on the system tray. To access the tray, simply click the up arrow at the bottom right corner of the taskbar to bring up all the apps running in the background.

If you see any programs that you don’t need, you can right-click and close them.

You can also make sure that these programs don’t bother you by making sure they don’t open the next time you boot up your PC. Right-click on the taskbar and open up Task Manager from the context menu. You can also open it by clicking on Ctrl-Shift-Escape.
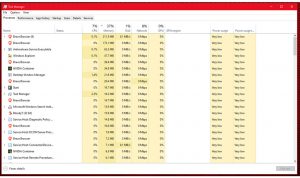
Afterwards, go to the Startup tab. This tab will contain a list of all the apps that run on startup, and you can also see the impact of the app on performance in the fourth column.
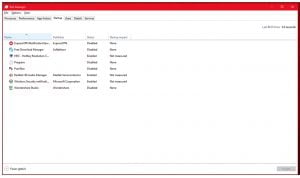
Take a look at each one of the apps listed and disable the ones you don’t use often. Doing so will provide a significant boost to your performance, especially if you’re able to disable a few high-impact ones. However, it would be best if you kept certain apps open that are vital to the system.
For instance, you should probably let the apps which have Microsoft as a publisher be as they are. You should also keep apps with Realtek as a publisher enabled, as they’re part of the audio driver and can cause your audio to break if they don’t run.
If you’re unsure whether you should keep a program or disable it, you can just Google it to find out. The actual disable process is easy; you only need to select the app and press the disable button on the bottom-right corner of the window.
This method is for Windows 10, though. If you’re using Windows 7 for some reason, you might get better performance if you upgrade to 10. For Windows 7, the startup apps aren’t listed on the task manager. To access startup apps in Windows 7, you need to open the “Run” window first.
To do so, hold down the Windows Button and R together until the “Run” window opens. In the open field, type “Msconfig” and press Enter or click OK.
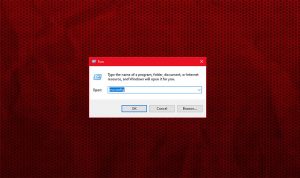
A new window will pop up titled “System Configuration”. You can find the Startup tab on the far right. Once you view the tab, you can use the tick boxes beside the programs in the list and uncheck any that you don’t want to run.
2. Get rid of unused apps and bloatware
While you can keep most resource-intensive applications off with the system tray and startup prevention, it might be better to delete some altogether. Several applications run in your background without being obvious about it or eat up system memory by keeping certain services turned on.
If there are any apps that you don’t use at all, you can delete them to make sure such a thing doesn’t happen. Doing so can also potentially free up space in your main drive, and if the performance issues were happening due to low disk space, they would go away.
Uninstalling programs doesn’t take much effort either. Most people know how to do it, but if you’re new to Windows 10 then here’s what you need to do. Simply open up your “This PC” window, then go to the “Computer” tab in the above ribbon. You’ll see an uninstall option on the far right on all the actions under the tab.

Just click it, pick any program from the list that pops up and right-click on it to get the uninstall option.
However, you can’t remove some programs from Windows entirely with the basic uninstall. A few might leave residual files which take up space on your main system drive. As a result, your laptop will still remain slow. You have to go an extra mile if you want to make sure the app is completely uninstalled.
You can do so by either using the third party uninstalling apps or a cleaner. We recommend using either IObit Uninstaller for a direct uninstall or cleaning residual files with CCleaner.
3. Run the disc cleanup utility
Many people opt for using third party cleanup apps instead of the cleaning utility that comes with Windows instead. While that may be a good idea, using the disc cleaner will also help, as it has easier access to system files.
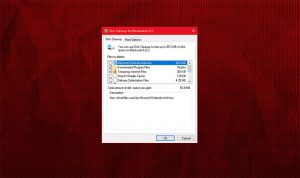
To run the disk cleanup utility, you need to open up your search by pressing the Windows button with the S button. You can write disk cleanup in the search field, and a program will show up with the same name. Clicking on it will bring the Drive Selection window, where you should select your main drive, which is usually the C drive. Once you’ve clicked OK, the next window will be the main disk cleanup window. Click on “Clean up system files” on the bottom left.
You might need to re-select the drive again before you get to the next window, where you can check all the options that have large sizes. Afterwards, click OK, and you’ll be done.
4. Get rid of malware
If you’ve tried out the earlier tasks and your laptop still seems slow, then that might be the result of malware. Malware can enter your laptop fairly easy if it isn’t well-guarded, and the Internet is full of these.
Newer forms of malware can enter laptops even easier. Once any of it gets inside, your data stays at risk, and your laptop slows down noticeably. The worst thing is that you generally won’t know about it being in your laptop until it’s too late. However, if you notice the malware early enough, you can get rid of it and prevent others from entering your laptop again.
All you need to do is install reliable antivirus software. Most of the higher quality ones cost some money, but will always provide you with excellent protection. You can buy a licensed copy of the software from a local computer shop or register the software yourself. If you want to go towards the free route, we’d suggest a free version of Avira Antivirus software.
5. Remove bloatware
While the name may sound similar to malware, it’s not as dangerous. It can still slow your computer down significantly, though. Several laptops come preinstalled with software from both manufacturers and third-party software developers. The third-party software are included as a deal between manufacturers and the developers to reduce the laptop’s overall costs.
Sometimes, these additions do help the user in one way or another, but for medium and low range laptops, such things are just memory hogs. They suck in resources just like the unused software we mentioned earlier in the list. Bloatware also consumes a lot of storage space.
While preinstalled apps like Microsoft Office or Dropbox can be handy, it’s still good to look through the list of apps you didn’t install yourself and delete the bigger ones.
6. Defrag hard disks
Most HDDs tend to suffer from fragmentation issues. In fact, these fragmentations can affect the physical body of the hard disk. Fragmentations occur when the various pieces of a full file get scattered around the hard drive’s physical disk. As a result, the drive head has to go around further to read each separate piece of data. This results in the system slowing down.
Defragging the disk organises the disk’s data so that every bit that makes up a single file is grouped in the same physical space. The organised manner allows the system to read the data faster and travel much less to do so. Although, do keep in mind that SSDs don’t need defragmentations, as they don’t have any spinning data disks.
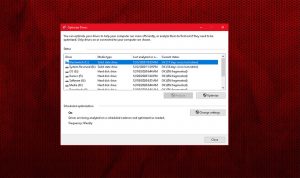
The defragmenting process isn’t complicated, either. You just need to head over to Windows 10’s system settings and find the “Optimise drives” in the storage tab. Clicking on it will open up the optimisation window, where you can analyse all your drives and get a percentage on how fragmented every drive is. Afterwards, you can defrag the drive to get a boost in stability and performance.
7. Using ReadyBoost
ReadyBoost isn’t a very well known feature, but it’s been around ever since Windows Vista. It allows you to potentially boost some of your system memory through a flash drive. It’s not as good as changing an HDD to an SSD or expanding RAM, though. But, you’ll still be able to get a small performance boost, which will be more noticeable if you use a laptop that doesn’t offer a lot of RAM.
ReadyBoost can help in increasing overall performance by turning a portion of the flash drive into cache memory. The system can then take advantage of the specialised memory to increase app opening speeds and random read access speeds.
To turn on ReadyBoost, you need to put a USB drive into the laptop first. You can then go select the drive in the “This PC: window then right-click it. From there, go to the device’s properties at the bottom. Once inside the properties window, you can find the ReadyBoost tab on top. You can set the amount of drive space you’ll let the system use in this tab and confirm the value afterwards. We recommend allowing the system to use as much of the drive as possible.
Something to keep in mind, though, is that sometimes your laptop may not need ReadyBoost. That may happen if all the other tweaks help increase your laptop speed significantly. In such a case, Windows won’t let you use ReadyBoost as your system won’t gain much from it.
8. Disable extra animations
Ever since Microsoft’s operating system has started getting more advanced (Starting from Windows XP or Vista), there have been fancier graphics with each iteration afterwards. While these make Windows pleasant to use in high-end laptops, they also hinder some laptops’ productivity by bringing down performance.
For the most part, Windows will automatically adjust the graphical settings based on your system’s power. If you want to tone down the visuals for the sake of speed, though, then Windows also lets you manually adjust these settings.
To do so, enter the “My Computer” or “This PC” window first, before right-clicking on a blank spot. You have to make sure the cursor isn’t on any long list by the left side of the window. Then, enter your computer’s properties from the context menu that pops up. You can see an option called “Advanced system settings” on the left pane in the properties window.

Click on it and then press “Settings” under the section that says “Performance”.
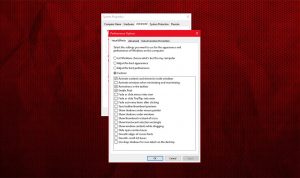
In the resulting window, you can set Windows to adjust automatically, or you can set the settings to go either for full performance or the best visuals. You can experiment and configure your own combination of settings in the list below instead of using the presets. After you set the settings to be less visually intensive, you’ll immediately notice the difference as soon as you press OK.
Although, do note that if you do this on operating systems older than Windows 10, the UI might transform into a very old looking Windows 95-style look.
9. Turn of automatic updates
Generally, having software updates turned on is a good thing, as it keeps your machine working smoothly and more bug-free. Plus, having auto-updates turned off might cause your system to have vulnerabilities.
However, sometimes it’s also good to keep a few of these off. Take the Adobe Creative Suite, for example. It receives significant and frequent updates, which sometimes causes many extra resource-intensive tasks to run in the background.
If you turn its auto-update feature off, you might get much better performance as the update won’t get in your way. Besides, you can still update the app manually when you need to use it.
However, make sure you don’t change anything about essential software or services like Antivirus or Windows updates. These are better off left on automatic. If you really need the extra bit of juice, though, then you can set them to download and install updates periodically at certain times. That way, you can get the updates done when you’re not using the laptop, like at night.
10. Increase the search speed
While changing your laptop’s search function’s speed won’t do anything for overall performance, you can still increase some of your productivity. Searching a big drive for a certain time can take a long time. You can improve your laptop’s search speed by changing the location which Windows Search indexes, getting rid of folders that have files you wouldn’t look for.
For instance, you can exclude the App Data folder, which contains log files, browser cache and cookies for the most part. You can also exclude programs like Internet Explorer or Edge if you don’t need them indexed.
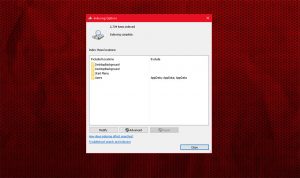
To access Indexing settings, you can just search for “Indexing Options” on the taskbar search box. Everything else will be self-explanatory as soon as you open the Indexing Options window, as it’s quite straightforward. You can include or exclude any locations you want from the window.
11. Clean the internet cache
Though this may seem insignificant, browser caches can actually take up gigabytes worth of data if left unchecked. Cleaning these up will free up more space in your drive and provide a small performance boost. The actual task of deleting these caches is straightforward for every modern browser.
You just need to go to the settings and look for any option which clears the browser data. Once you click it, you should usually get presented with choices over what sort of data you wish to clear, caches included.
If you use multiple browsers, then you can use a third part cleaner app like CCleaner to get it done for all browsers. You can also go further to ensure all files are cleaned off by taking care of your temporary file folders. You can enter these folders by opening up the “Run” prompt and writing %temp%, temp and prefetch in the box to open all three of the temp folders.

It’s safe to delete all the files in the folders, so you can go ahead and do that without any issues.
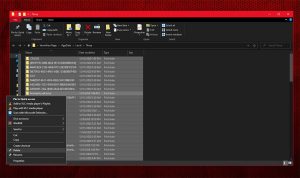
If you can’t delete specific files, that just means that it is likely being used by an app. In such a case, you can wait until later to be able to delete that file as well.
12. Using third party performance boosters
If you’re using a cheaper or older laptop, you might benefit from using a system cleaner. Some cleaners are basic, while others go deep into the system. If your laptop isn’t that slow, you can stick to CCleaner which will be enough on its own.
But, if its really in need of optimisation, you can use IOBit’s Advanced Systemcare program. It goes beyond cleaning up files and releasing storage space. Advanced Systemcare cleans junk files and fixes up various issues regarding the system performance, security and even internet speed. As the software is more thorough, it might be more taxing on your laptop resources though.
We suggest running the software periodically and uninstalling it after each use if your laptop isn’t all that powerful. You can download and clean your system with it every month to get the best use out of it. Though, if you’ve got a higher-end laptop that has plenty of RAM to spare, then it might benefit you from having the software running in the background.
Also, Systemcare is one of the software you can invest money into as it offers multiple useful tools in its Pro version and is relatively inexpensive.
13. Disabling Superfetch
This tip isn’t the same for every laptop, and some can actually run better if it stays on. Most people who try to learn how to speed up laptops tend to miss this method, but if your laptop is right for it, you can gain a remarkable performance boost.
Most higher-end laptops run just fine with it on, but the ones on the lower-end tend to struggle quite a bit as it runs in the background and eats many resources. It helps powerful laptops because it can make apps launch faster, and the laptop can endure the amount of resources it takes up.
It’s fairly easy to turn the service off if you want to see whether if it’s good for the performance or not. You need to launch the services app first from the Windows + R “Run” menu. Type “services.msc” in the empty field top enter the services app. Now, once you’re in the app, scroll down until you find Superfetch.
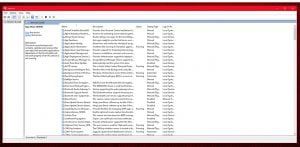
Before you attempt to disable it, stop the service first by right-clicking on it as it won’t turn off until you restart otherwise. Once you’ve done that, right-click on the service again and go to its properties. In the General tab, you’ll see an option named “Startup type”. Set the option to “Disabled”, press OK and you’re set.
14. Reinstalling the OS
Lastly, before you start looking for more expensive options for fixing the laptop’s speed, you can also reinstall Windows as a last resort. Remember that it’ll remove all your personal data, though. So remember to back up all your data in a separate drive before you do a fresh install of Windows. You also need to make sure your internet is stable as well since you’d likely need to install updated drivers.
Recommended Reading: 11 Best laptops under Rs. 40000
How to speed up laptops by upgrading hardware
1. RAM
If none of the above worked to make your laptop run fast enough, it might be time to spend some money and upgrade some physical parts of the laptop. Besides, as apps are using more resources with each update, your laptop might just be struggling with memory. If you see your laptop suddenly starts lagging after running smooth, then it’s almost certainly the memory problem.
However, do keep in mind that laptops aren’t as upgradeable as a desktop computer. Lower end laptops only have maximum RAM support for 8 GB. If you want to make sure you have a laptop that doesn’t slow down easily and lasts long into the future, then you might have to go for a laptop with more RAM expansion. As long as you have a good laptop around 50k or something more expensive and higher-end, then you can have minimum support of 16 GB at least.
Recommended Reading: 11 Best laptops under 50000
2. Storage
Your laptop might slow down fairly quickly if it only runs on an HDD. These are incredibly old and don’t process data all that fast. You can swap the HDD for an SSD, or add in an extra SSD if the laptop has additional storage slots.
If you can’t afford an SSD or don’t have an additional slot for one, you can go for an Optane Memory instead. That way, you get to keep the HDD’s storage while having a lot of the speed you’d get from an SSD.
3. Cooling
Oftentimes, laptops can get incredibly hot sometimes, so hot that they start sounding like a plane going off. That noise means that the laptop temperature is far beyond what’s safe for it. When that does happen, the processor attempts to reduce the heating by suppressing its performance.
Most laptops come with their own built-in cooling systems which keep the laptop temperature in control. These systems are usually a mix of fans and heat sinks. Though these don’t always suffice for the laptop and you have to reach out for external solutions. If you have an air-conditioned room, then using the laptop there as much as possible might help.
You can also go for cooling pads, which you can place under your laptop where the pad blows cool air to its underside. As a result, the laptop’s parts of the laptop have a much smaller risk of overheating. These cooling pads work the best with laptops that have vents at the bottom.
We also strongly advise against gaming on a laptop with bad cooling. Cooling pads will help but not significantly. If you were trying to look for speed to play videogames, then you might want to reconsider. That is unless you have a laptop with adequate cooling, which is something that usually comes with a laptop around 60k or above.
Recommended Reading: 11 Best laptops under 60000
4. Getting a GPU
As we mentioned earlier, if you were looking for a laptop to play games on, then you might need to go for more expensive options. If your laptop supports dedicated graphics cards, you can upgrade the laptop’s GPU and run several games at a good speed. And If you’re a video editor that wants the laptop to be faster to help with your work, then you can get this upgrade as well.
If your laptop did have a dedicated graphics card beforehand, then you might want to update the drivers to have a good boost in GPU performance. And if you haven’t, tweak your GPU settings as well. Most GPU manufacturers add extra control with their software that allows the user to switch between getting more visuals and getting more performance.
5. Getting a mechanic to check on the laptop
If none of the methods above work, then you more than likely have faulty components on your laptop’s motherboard. Something like a failing fan can easily throttle your laptop performance and cause it to run terribly. Other components can be affected similarly, as well. It would be best if you got the laptop’s components looked at.
While such a thing is something you can easily do for yourself on a desktop computer, it’s not something you can do as easily in a laptop.
Laptop parts are usually more fragile than their desktop counterparts, as they’re meant to be compact and not durable. That’s why you should have an experienced technician check your laptop’s hardware to see if everything’s working correctly.
Recommended Reading: 11 Best laptops under 30000
Conclusion
That’s it for all the tips we can offer. We’ve made sure to tell everything about how to speed up laptops so that you can bring yours out to its fastest potential. The tips above are a combination of advanced and regular user tips that anyone can follow.
Although, if you dig deeper, you can find even more methods to speed up the laptop. Everything we said should give you some experience about the more complicated optimisation aspect and allow you to delve deeper by yourself.
- Need An Entry-Level NVIDIA GTX 1650 Laptop? Check Out The ASUS TUF Gaming A15 15.6″ FHD AMD Ryzen 5 4600H - December 19, 2022
- Why You Should Try The Lenovo IdeaPad Gaming 3 AMD Ryzen 5 5600H 120Hz Gaming Laptop – A Laptop Designed To Last - November 8, 2022
- A Review Of The HP Pavilion Gaming DK2100TX 15.6-inch Laptop – The best 11th Gen Mid-range Laptop - November 8, 2022
