Regardless of how big your hard drive or solid-state drive is, you’re going to run out of space sooner or later. That can be incredibly troublesome, especially when important drives start getting cramped because of excess files. To keep your desktop or laptop running properly, you have to take steps and do some maintenance work. I’ve prepared this guide for you to help squeeze every bit of free space out of your system. So, without further ado, let’s talk about how to free up more disk space on windows.
1. Using Windows Storage Sense
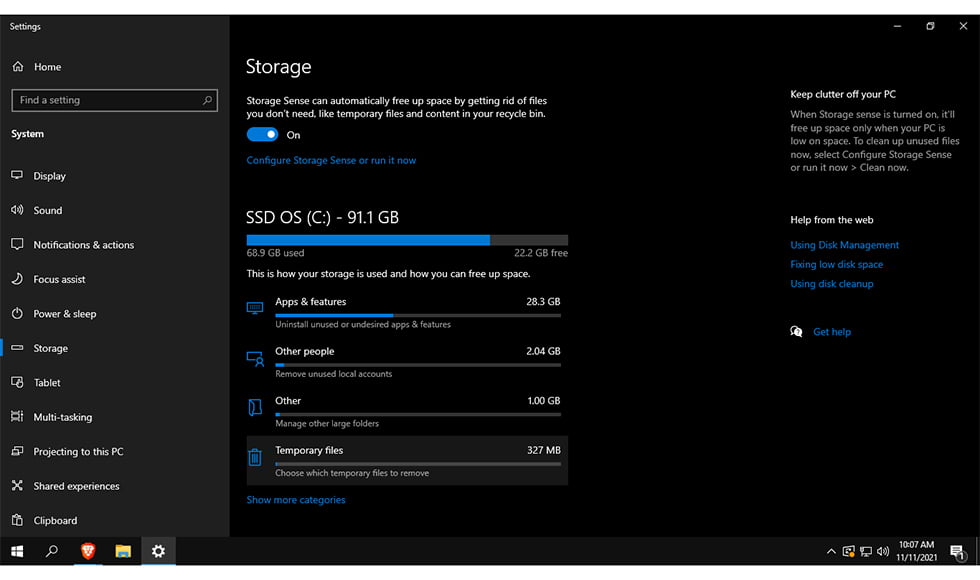
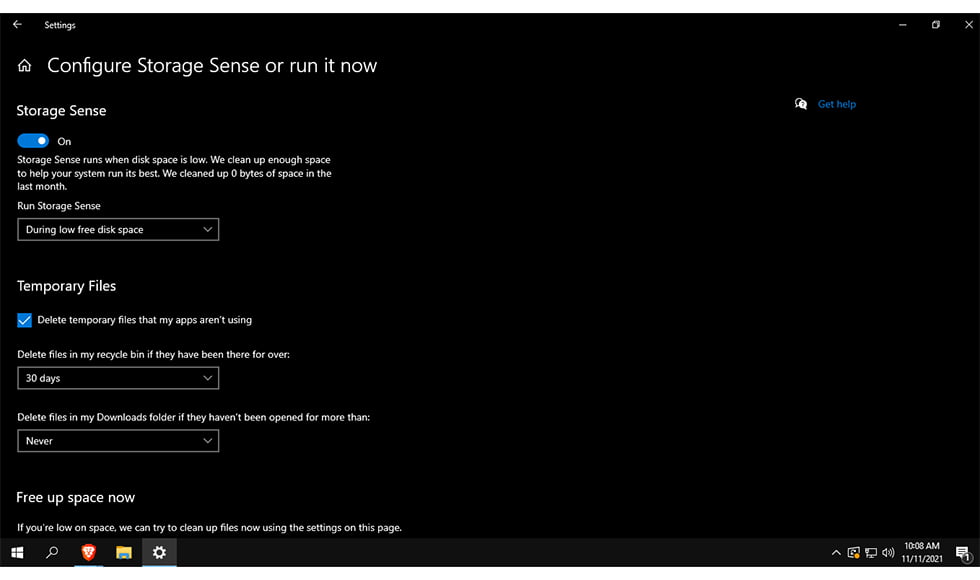
Windows has some powerful built-in tools of its own that you can use to free up space in your drives. Storage Sense is incredibly powerful because it comes with a lot of versatility. This feature will automate the cleaning work for you and do the cleaning well. You can set it to run every month, week or even every day. It gets rid of unused temporary files for the most part, but you can also set it to delete files in your recycle bin and downloads folder that haven’t been used for a certain amount of time.
You can access Storage Sense settings easily by using Windows Search. This is how the feature’s main settings screen looks like.
If you press “Configure Storage Sense or run it now”, you can change all the settings I mentioned earlier.
2. Cleaning Temp Folders
This one’s a classic amongst advanced users. While Storage Sense does a lot of work for you, you could always take things a step further by cleaning the temporary folders yourself. Accessing the folders doesn’t take much effort either. Just press the ⊞ Win and R keys on your keyboard, which open up this prompt.
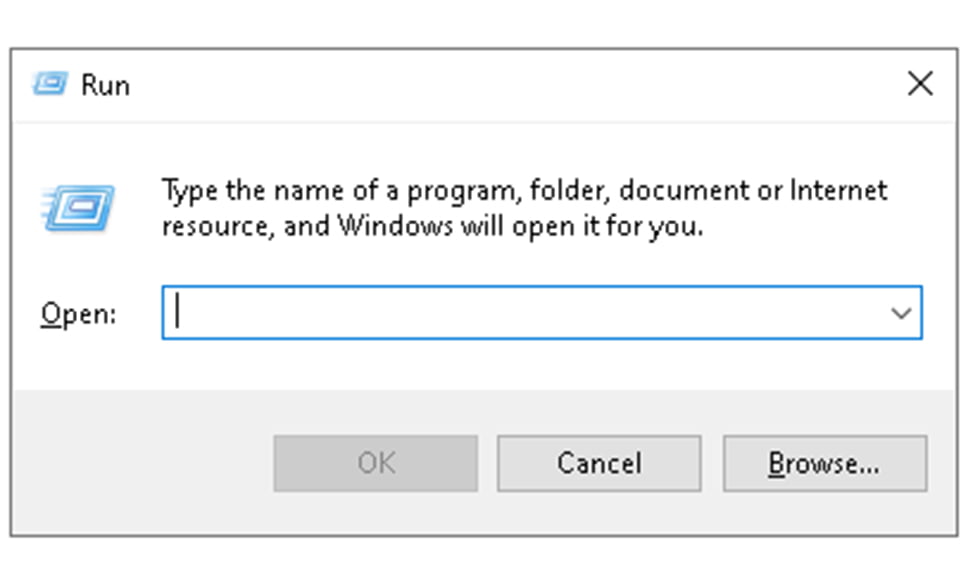
Once it’s open, you need to type some folder names and clean each of them up. You might not be able to delete a few files, but deleting the ones that Windows allows you to will be good enough. Type in the name of the following folders and press OK to access them; Prefetch, Temp and %Temp%.
Recommended Reading: 11 Best laptops under 30000 in India(2023) – Reviews & Buyer’s Guide
3. Using Windows Disk Cleanup
Running the Windows Disk Cleanup tool after running Storage Sense is also a good way of squeezing out a little bit of extra space. To bring out the tool, just right-click the Drive you need to clean and click its properties. There should be a Disk Cleanup button at the bottom of the General tab. With the Cleanup tool open, simply tick off the categories taking too much space and press OK. Also, you need to make sure you press the “Clean Up System Files” button before selecting what you need erased, as some unused system files can go to large sizes sometimes.

4. Uninstall Bloatware
If you haven’t done this whilst setting up your system, now would be a perfect time. To remove the bloatware, open the Add or Remove Programs settings section by using Windows Search and uninstall the biggest unused programs. You can sort all the programs by size to make things easier for yourself.

Bloatware is most common in pre-built systems, though high-end laptops or desktops don’t have such an issue.
Recommended Reading: Which are the Best laptops under 50,000 in 2023? Top 11 Picks
5. Clean Up Your Desktop
A lot of users have a bad habit of storing large files on their desktop. I have this habit myself. It’s not a good thing to do, especially when the System drive doesn’t have a lot of space. The desktop files are put into the System drive, reducing its free space even more.
So, to prevent your System drive from being overloaded and to stay lag-free, you should always move your desktop files to other drives when you’re done using them. The same goes for Downloaded files. If there are some you don’t want to delete; you can move them over to another drive.
6. Use A Disk Analyzer
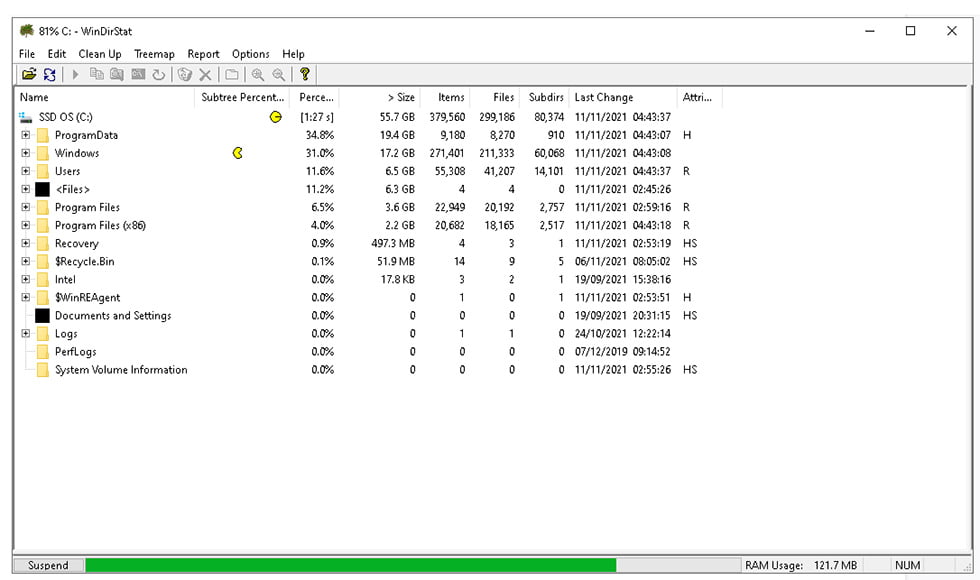
Some unnecessary files can stay deep inside your system. Using a program like WinDirStat is a good way to figure out exactly what’s eating up your space. Open the application and browser over the drive with low space. You’ll be able to see all the folders and items that have the largest sizes. Just watch out for deleting System files- that can get you in trouble. Never try to delete anything extra in the Windows folder.
7. Store Things In The Cloud
Cloud Storage is an excellent alternative if you don’t want to keep stuff in your other drives. I would suggest learning to use OneDrive, as it ships with Windows 10 and integrates well into the system.
There’s one thing you need to enable before using this particular service, though. Open your OneDrive settings and look for an option called “Save space and download files as you use them.” You can turn that on to prevent your PC from storing offline versions of cloud files and ensure maximum space efficiency.
8. Third-Party Apps
Third-party apps like Piriform’s CCleaner and IOBit’s Advanced SystemCare are great for cleaning up temporary application files. These apps can scan applications better, and if you browse often, they’ll be even handier. Cache files and other temp files from browsers can take up a lot of system space. These apps can clean those files up. Another great benefit is that they can scan for duplicate files and get rid of them as well.
Just be sure to uninstall them afterwards, as they run in the background and use important resources. You’ll have good results if you install and run one of these apps every once in a while.
Recommended Reading: Top 9 Best Laptops Under 70000 in India 2023: Expert Reviews
9. Disabling Hibernation
This particular tip is a little more obscure. Unless you specifically need to keep Hibernation on, it’s better to keep it off. The feature essentially keeps a backup of your apps and drivers in their last running state and acts as an alternative to the Shut Down option. If you use it instead, your computer will start up faster, and you’ll be able to continue with your files where you last left off.
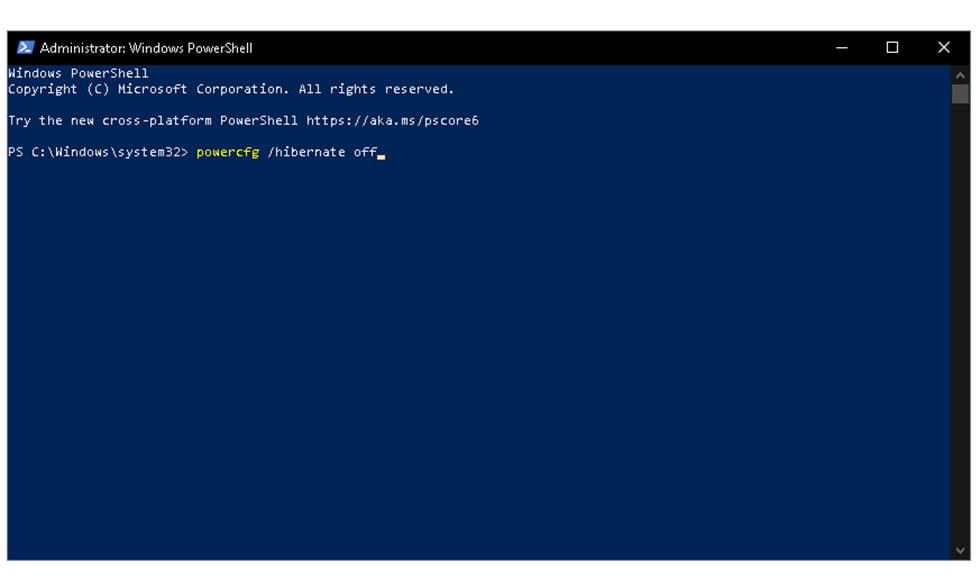
However, there is a catch. The backup is stored inside your drive and takes up a significant amount of space. In fact, the hiberfil.sys file sometimes takes more than a gigabyte’s worth of space, resulting in terrible performance if the drive space goes low enough. If you can stand an extra few seconds of boot time, you can keep a good amount of free space by disabling Hibernation.
To disable it, right-click your start menu icon and press Command Prompt (Admin). Some systems might show Windows PowerShell (Admin). You can use that too, as the functions are similar. Once either of the apps open, write down “powercfg /hibernate off” (without the quotes) and press enter. There, you’ll have turned off hibernation. If you ever need to use it again, just type in “powercfg /hibernate” to re-enable it.
10. Reduce Allocated Space For System Restore
Now, before trying this step, you should think twice about doing so. System Restore is incredibly powerful for troubleshooting. You can still have some of its benefits even after limiting how much space it can use, but you can’t create as many backups of your system, and some of your files might not get restored if you use it when something happens. I would recommend giving at least a GB of free space for System Restore to work with.
To adjust the setting, search “System Restore” on Windows Search and open up the control panel item that pops up called “Create A Restore Point”. Once the next Window opens, press the configure button at the bottom. The resulting Window will be what you’re looking for.

Recommended Reading: Best Gaming Laptops Under 60000 in India 2023 – Reviews & Buyer’s Guide
11. Reduce Paging Size
Like my earlier tip, adjusting this might be inconvenient for you based on your hardware. For a low-end laptop or desktop, letting the system decide things is a good idea. If you’ve got decent hardware, though, then changing the setting can give you some extra space. To do so, first right-click your Start Menu logo and press “System” to go to your System Info screen, which looks like this;
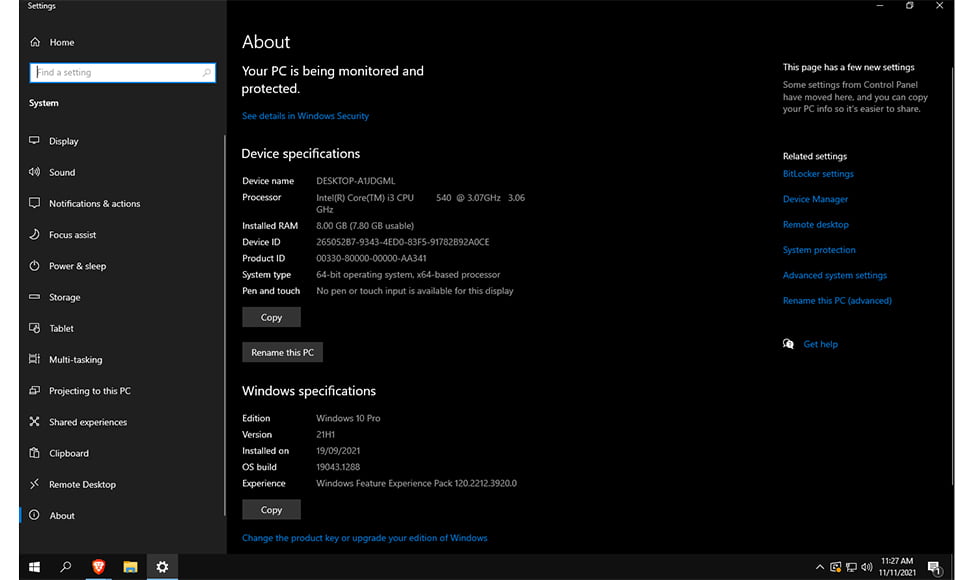
Click Advanced System Settings on the right pane. On the Window that pops up afterwards, click “Settings” under “Performance”.
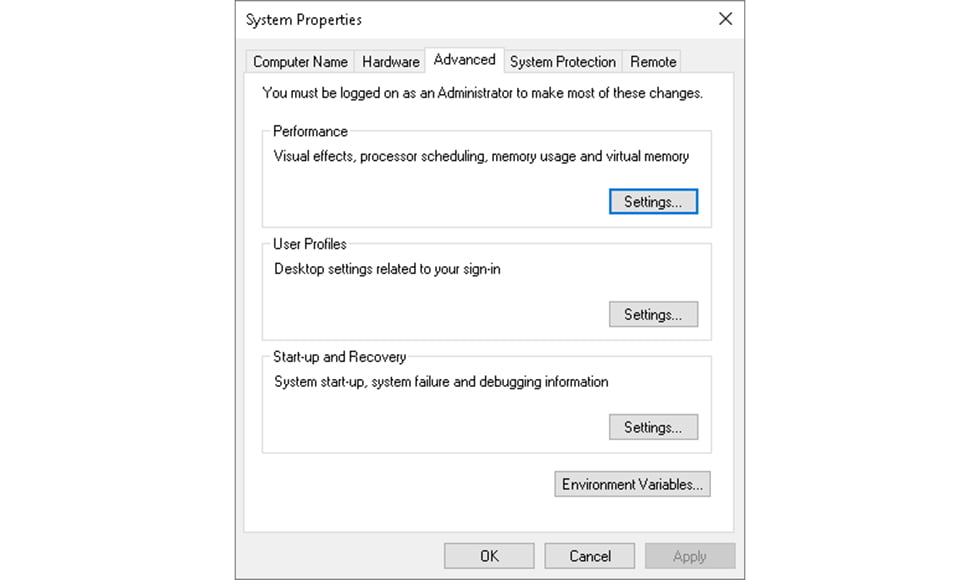
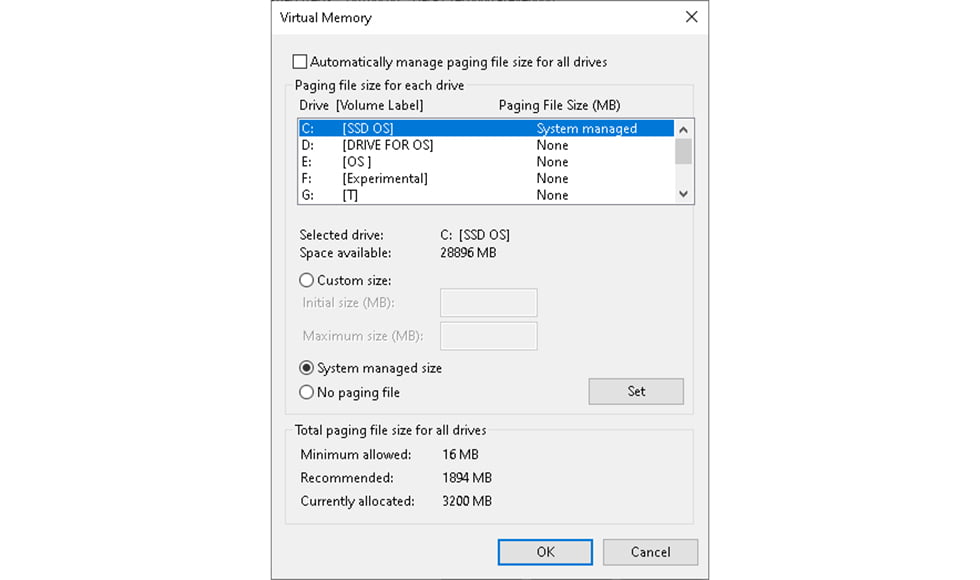
Then, go to the Advanced tab of the next Window and press “Change” under Virtual Memory. In the “Change” window, you can manually set paging file sizes after removing the checkmark of the first option. If the drive low in space has a paging file, you can adjust the size and click “Set” then “OK” to apply the new size. Be sure to restart your Windows afterwards.
Extra Tip: Always Have Free Space In Your System Drive
It’s normal to have drives with very little space. You generally won’t bump into any problems with them unless you need to store some files. However, you must keep the drive containing your Windows files clean at all times. Clogging it up will result in laggy performance. Never let the bar under this drive go red, as that means that your system will start struggling.
Although, you probably won’t notice much difference if your Windows is installed on an HDD. If it is, I’d really suggest getting a small 128GB SSD just for the Windows installation, as SSDs are faster than HDDs.
Recommended Reading: Best Laptops for Students in India 2023 – Reviews & Buyer’s Guide
Parting Thoughts
Now, you know all about how to free up more disk space on windows. All my tips are the best ones you can find, and if you follow through with all of them, you can get a few extra gigabytes of space to use, or even more if you haven’t cleaned your computer for a while. If the latter was your case, you’ll probably get a good performance boost too.
Either way, good luck and enjoy all the extra space you get.
- Need An Entry-Level NVIDIA GTX 1650 Laptop? Check Out The ASUS TUF Gaming A15 15.6″ FHD AMD Ryzen 5 4600H - December 19, 2022
- Why You Should Try The Lenovo IdeaPad Gaming 3 AMD Ryzen 5 5600H 120Hz Gaming Laptop – A Laptop Designed To Last - November 8, 2022
- A Review Of The HP Pavilion Gaming DK2100TX 15.6-inch Laptop – The best 11th Gen Mid-range Laptop - November 8, 2022
